『数据结构与算法』—— 队列
字数统计:
1,693 字
|
阅读时长:
8 分
| 本文总阅读量: 次
定义
有一定的业务需求就会有对应的技术或数据结构产生。我们都知道 CPU 的资源是有限的,任务的处理速度与线程个数并不是线性正相关。相反过多的线程反而会导致 CPU 频繁切换,处理性能下降。所以线程池的大小一般都是综合考虑处理任务的特点和硬件环境,来事先设置的。
队列的特点 先进先出,可以想象成排队买票,先来的先买。最基本的操作就是 入队和出队,所以队列跟栈一样,也是一种 操作受限的线性数据结构。
实现
类似栈,可以通过数组和链表试下,数组实现的队列叫做 顺序队列,链表实现的队列叫做 链式队列。
顺序队列
核心思想在于,使用两个下标保存头部和尾部的数据,也可以当成标识。因为入队是从屁股进行插入,出队是从头部拿出数据,因此要记住头尾的位置。
先来看一下简单的实现方式:
1
2
3
4
5
6
7
8
9
10
11
12
13
14
15
16
17
18
19
20
21
22
23
24
25
26
27
28
29
30
31
32
33
34
35
36
37
38
39
40
41
42
43
44
45
46
47
48
| class ArrayQueue<T> {
T[] items;
int head;
int tail;
int count;
ArrayQueue(int capacity) {
items = (T[]) new Object[capacity];
count = capacity;
}
boolean enqueue(T t) {
if (tail == count) return false;
items[tail] = t;
tail ++;
print("enqueue");
return true;
}
T dequeue() {
if (head == tail) return null;
T t= items[head];
items[head] = null;
head ++;
print("dequeue");
return t;
}
void print(String mode) {
System.out.println("mode:\t" + mode + " head:\t" + head + " tail:\t" + tail);
for (int i = head; i < tail; i++) {
System.out.print(items[i] + "");
}
System.out.println();
}
public static void main(String[] args) {
ArrayQueue<String> queue = new ArrayQueue<String>(6);
queue.enqueue("1");
queue.enqueue("2");
queue.enqueue("3");
queue.dequeue();
queue.dequeue();
queue.dequeue();
queue.enqueue("5");
queue.enqueue("6");
}
}
|
运行结果:
1
2
3
4
5
6
7
8
9
10
11
12
13
14
15
16
| mode: enqueue head: 0 tail: 1
1
mode: enqueue head: 0 tail: 2
12
mode: enqueue head: 0 tail: 3
123
mode: dequeue head: 1 tail: 3
23
mode: dequeue head: 2 tail: 3
3
mode: dequeue head: 3 tail: 3
mode: enqueue head: 3 tail: 4
5
mode: enqueue head: 3 tail: 5
56
|
上述实现的方式有一个弊端,当 tail == n 的时候,就不能继续插入数据,但是此时容器并没有装满,只是不能继续往后插入数据了。那这个时候就需要对容器进行改变:数据搬移。单并不是每次入队都需要迁移,为了优化时间复杂度,可以在每次尾节点到达终点时,再开始数据搬移,即数据往前移动 head 的位置。
来看一下实现方式:
1
2
3
4
5
6
7
8
9
10
11
12
13
14
15
16
17
18
19
20
21
22
23
24
25
26
27
28
29
30
31
32
33
34
35
36
37
38
39
40
41
42
43
44
45
46
47
48
49
50
51
52
53
54
55
56
| class DynamicArrayQueue<T> {
T[] items;
int head;
int tail;
int count;
DynamicArrayQueue(int capacity) {
items = (T[]) new Object[capacity];
count = capacity;
}
boolean enqueue(T t) {
if (tail == count) {
if (head == 0) return false;
for (int i = head; i < tail; i++) {
items[i - head] = items[i];
}
tail -= head;
head = 0;
}
items[tail] = t;
tail ++;
print("enqueue");
return true;
}
T dequeue() {
if (head == tail) return null;
T t = items[head];
items[head] = null;
head ++;
print("new dequeue");
return t;
}
void print(String mode) {
System.out.println("mode:\t" + mode + " head:\t" + head + " tail:\t" + tail);
for (int i = head; i < tail; i++) {
System.out.print(items[i] + "");
}
System.out.println();
System.out.println(Arrays.toString(items));
}
public static void main(String[] args) {
DynamicArrayQueue<String> queue = new DynamicArrayQueue<String>(4);
queue.enqueue("1");
queue.enqueue("2");
queue.enqueue("3");
queue.enqueue("4");
queue.dequeue();
queue.dequeue();
queue.enqueue("5");
queue.enqueue("6");
}
}
|
结果:
1
2
3
4
5
6
7
8
9
10
11
12
13
14
15
16
17
18
19
20
21
22
23
24
25
26
27
28
29
30
| mode: enqueue head: 0 tail: 1
1
[1, null, null, null]
mode: enqueue head: 0 tail: 2
12
[1, 2, null, null]
mode: enqueue head: 0 tail: 3
123
[1, 2, 3, null]
mode: enqueue head: 0 tail: 4
1234
[1, 2, 3, 4]
mode: new dequeue head: 1 tail: 4
234
[null, 2, 3, 4]
mode: new dequeue head: 2 tail: 4
34
[null, null, 3, 4]
mode: enqueue head: 0 tail: 3
345
[3, 4, 5, 4]
mode: enqueue head: 0 tail: 4
3456
[3, 4, 5, 6]
mode: new dequeue head: 1 tail: 4
456
[null, 4, 5, 6]
mode: enqueue head: 0 tail: 4
4567
[4, 5, 6, 7]
|
想比较之前的实现,出队的逻辑并没有任何的改变,在入队是,需要判断 tail == 0,如果达到这个条件则可能需要进行数据搬移。
链式队列
思路其实类似于顺序队列的实现逻辑。
1
2
3
4
5
6
7
8
9
10
11
12
13
14
15
16
17
18
19
20
21
22
23
24
25
26
27
28
29
30
31
32
33
34
35
36
37
| class LinkedQueue<T> {
Node<T> head = null;
Node<T> tail = null;
void enqueue(T t) {
if (tail == null) {
Node<T> node = new Node<T>(t, null);
head = node;
tail = node;
} else {
tail.next = new Node<T>(t, null);
tail = tail.next;
}
System.out.println(head.toString());
}
T dequeue() {
if (head == null) return null;
T t = head.value;
head = head.next;
if (head == null) {
tail = null;
}
System.out.println(head == null ? "null" : head.toString());
return t;
}
public static void main(String[] args) {
LinkedQueue<String> queue = new LinkedQueue<String>();
queue.enqueue("1");
queue.enqueue("2");
queue.enqueue("3");
queue.dequeue();
queue.dequeue();
queue.enqueue("6");
}
}
|
运行结果:
1
2
3
4
5
6
| 1
1 2
1 2 3
2 3
3
3 6
|
需要注意的是:
- 入队的时候,需要考虑队列无数据的情况
- 出队的时候,需要考虑出队到最后尾节点的处理
循环队列
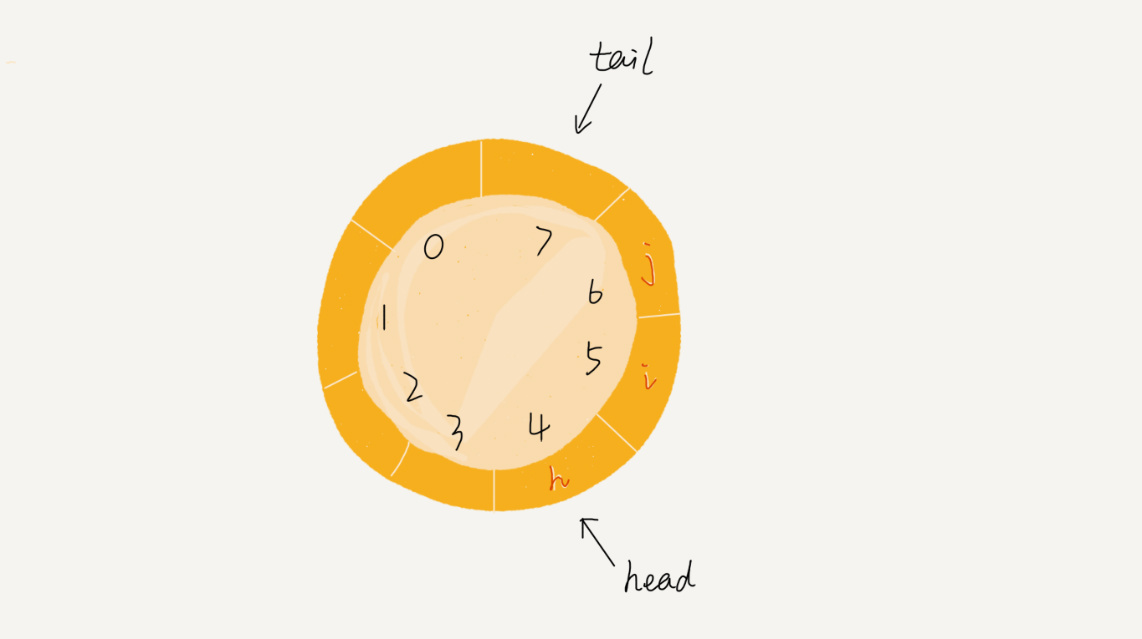
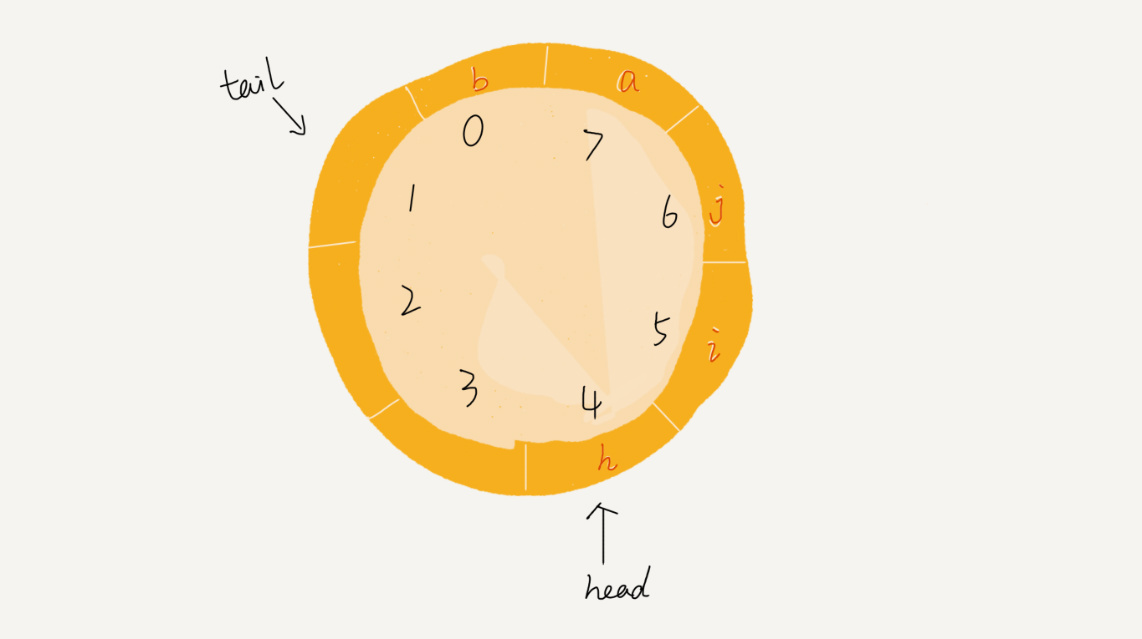
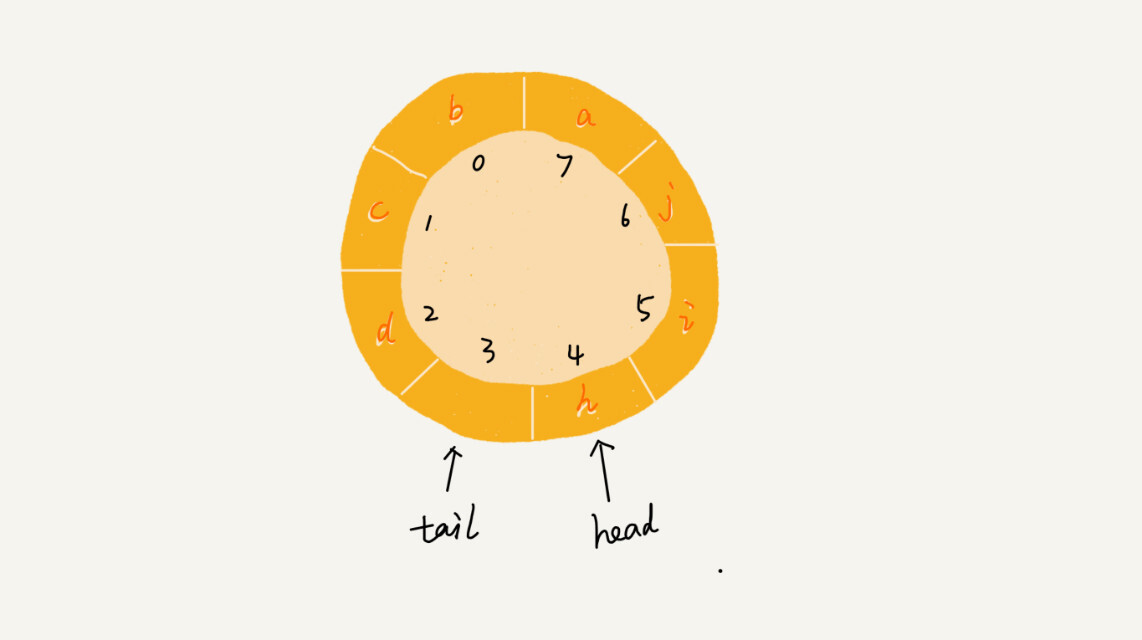
之前在用数组实现队列时,在 tail == n 时会有数据搬移的操作,这样入队操作性能就会收到影响,我们可以使用循环队列来解决这个问题。
循环队列其实长得像一个环,现在需要将首尾相连变成一个环。
放三张图感受一下,图片来自于极客时间的课程。


从图中可以发现规律,当 (tail + 1) % n = head 时,说明队列已满。
来看一下代码的具体实现方式:
1
2
3
4
5
6
7
8
9
10
11
12
13
14
15
16
17
18
19
20
21
22
23
24
25
26
27
28
29
30
31
32
33
34
35
36
37
38
39
40
41
42
43
44
45
46
47
48
49
50
51
52
53
54
| class CircularQueue {
private String[] items;
private int n = 0;
private int head = 0;
private int tail = 0;
public CircularQueue(int capacity) {
items = new String[capacity + 1];
n = capacity + 1;
}
public boolean enqueue(String item) {
if ((tail + 1) % n == head) return false;
items[tail] = item;
tail = (tail + 1) % n;
return true;
}
public String dequeue() {
if (head == tail) return null;
String ret = items[head];
head = (head + 1) % n;
return ret;
}
public void printAll() {
if (0 == n) return;
for (int i = head; i % n != tail; ++i) {
System.out.print(items[i] + " ");
}
System.out.println();
}
public static void main(String[] args) {
CircularQueue queue = new CircularQueue(5);
queue.enqueue("1");
queue.enqueue("2");
queue.enqueue("3");
queue.enqueue("4");
queue.printAll();
queue.dequeue();
queue.printAll();
queue.enqueue("5");
queue.enqueue("6");
queue.printAll();
}
}
|
运行结果:
1
2
3
| 1 2 3 4
2 3 4
2 3 4 5 6
|
参考自极客时间
#rewardButton {
background-color: #ea6f5a;
}
.btn-pay {
margin-bottom: 20px;
padding: 8px 25px;
font-size: 16px;
color: #fff;
background-color: #ea6f5a;
}
.btn {
display: inline-block;
margin-bottom: 0;
font-weight: 400;
text-align: center;
vertical-align: middle;
touch-action: manipulation;
cursor: pointer;
background-image: none;
border: 1px solid transparent;
white-space: nowrap;
padding: 6px 12px;
font-size: 14px;
line-height: 1.42857;
border-radius: 4px;
-webkit-user-select: none;
-moz-user-select: none;
-ms-user-select: none;
user-select: none;
}
#QR img{
height: 200px;
height: 200px;
margin: 20px;
}


